Tannus Tire Fit & Installation
it's very important to make sure the tannus tire you want will fit your rim!

check the rim width
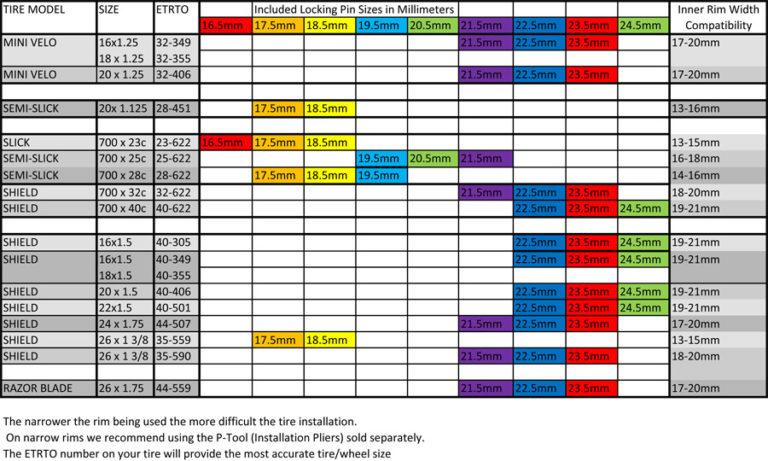
The width of your rim is one of the most important factors when determining which Tannus tire is right for you. Each Tannus tire model and size comes with different sets of locking pins for mounting the tire to the rim. Below is a chart of the locking pin sizes that come with each tire. Select a tire that comes with locking pins that are approximately 3.5 mm wider (give or take 1mm) than the INNER width of your bike rim.
check the tire size
Matching the tire size to what is currently on your bike is a good place to start, but you may need to select a Tannus tire that is slightly wider or narrower to fit your rim. When in doubt, go with the narrower tire since it will be easier to install.
Tires generally have their size listed in two formats on the sidewall. First is the size in inches or cm, second is the ISO or ETRTO size. Using the ETRTO size number from your tire tends to be more accurate and less confusing. A tire with an ETRTO size marked 37-622 indicates the width of 37 mm and the tire inner diameter of 622 mm. This designation is clear and allows an unequivocal match with the corresponding rim size.

a tannus tire needs to fit snugly to ensure a safe ride and proper mounting
If your rim looks like it will use the smallest locking pins that comes with the tire, it will be more difficult to install. This is because the bottom part of the tire that gets pressed into the rim is a fixed width, and the narrower the rim the more work you will have to do to “tuck” the tire in under the clincher part of your rim. For narrower rims, we recommend purchasing the Installation Pliers (P-Tool) if you are planning to do the install yourself. This tool helps to apply more pressure to the Locking Pins with less hand strength.
locking pin size chart

step-by-step installation
- Check your wheel to make sure it’s true and has no broken spokes. If your wheel is in good shape, remove your existing tire and tube. Be sure to remove your rim strip! The rim strip is not needed with a Tannus tire, and can cause issues with solid tires. If your wheel needs any repairs, make sure to fix it before installing your new Tannus tire.
- Measure the inside width of your bike rim and select the correct size locking pins. Select the locking pins that are 3.5mm (+/- 1mm) wider than the inner width of your rim. Selecting the correct size locking pins is important to ensure the tire is properly mounted.
- Insert the locking pins into the holes on the Tannus tire. The flat side of the pin faces outside (tread side) of the tire. The holes in the tire have a curved and flat part to help with proper alignment. You can use the flat end of the included tool to push the pins into place.
- Now it’s time to mount the tire to the rim! Especially with smaller tires, it’s easiest to snap in about half of the locking pins into the rim before you stretch the tire over the rim. This helps anchor the tire in place to keep it from slipping, as well as reducing the amount you have to stretch the tire. Position the tire so that the side of a locking pin facing away from you is sitting below the lip of your rim. Now you can use your installation tool (included stick tool or sold-separately P-tool) to press on the side of the locking pin facing you until it snaps into place. Snap in several pins until the tire is held firmly in place.
- Now it’s time to stretch the tire over the rim. Sit in a chair with the wheel in your lap or on the ground depending on the size of the wheel. Use one hand to hold the tire in place while you pry and stretch with the stick tool. As you pry and stretch, move your hand to hold the tire, slide the tool a couple inches forward, and pry again. Keep working your way around the wheel until the whole tire is stretched over the rim.
- With the tire fully stretched over the rim, snap the remaining the locking pins in place. You may have to tuck in the edge of the tire between the locking pins under the clincher part of the rim, especially if you have a narrow bike rim. Once all the pins have been snapped in place, look around both sides of the wheel to make sure all the pins are locked in place. If any of them are sticking up, snap them back in place.
- Now that the tire is installed on your wheel, you can reinstall the wheel on your bike. Make sure you remember to check your brakes to make sure they are properly adjusted before riding, and you’re all set!


